
(click to embiggen)
B1: Junction Room
A short corridor leads from the stairs into this dead-end circular room, whose walls are painted with distraught weeping faces. In the centre of the room is a very thick pillar, actually the continuation of the central pillar from the floor below. Around it is a stone collar with great carved wing-like protrusions that can be pushed to rotate it. Pushing this collar rotates the entire inner wall of the circular chamber, moving the arch to expose one of four passages.
Three of the passages are open, but the one leading towards room B8 is blocked by a granite slab. The slab is set with six quartz discs showing the symbols of the pyramid’s secret order (pendant, book, crown, river, dagger, jewel). An inscription reads: “You who would disturb our king: undo what was done, or despair!”
B2–B7: Symbol Rooms
In the centre of each of these rooms is a very large raised stone block marked with a symbol (respectively: book, jewel, crown, river, dagger, pendant). Each individual room is lit by a heavy bronze chandelier whose lamps burn with a magical flame. Like the central chamber, the walls in these rooms are painted with crying faces.
The blocks can be pressed down by something heavy, causing the respective quartz disc on the granite slab to illuminate. Rotating the central room’s wall causes all of the blocks to reset.
Symbol Puzzle
If all six blocks are pressed in the correct order, the door to B8 will open as the granite slab sinks into the ground. The correct order is the reverse of the order on the previous floor.
If the blocks are pressed in the wrong order, something will happen after the sixth block has been pressed. All of the blocks will reset, and all light sources on the floor will extinguish themselves. A spirit is summoned in a random chamber, wriggling its way out of the wall. It takes the form of one of the crying faces depicted on that wall, and glides through the air accompanied by the sound of pitiful sobbing.
After the spirit vanishes (either of its own accord, or because it was vanquished), the floor’s light sources will come back on.
B8: Stairs Up
Once the slab has been bypassed, these stairs lead upwards to the inner tomb.
(click to embiggen)
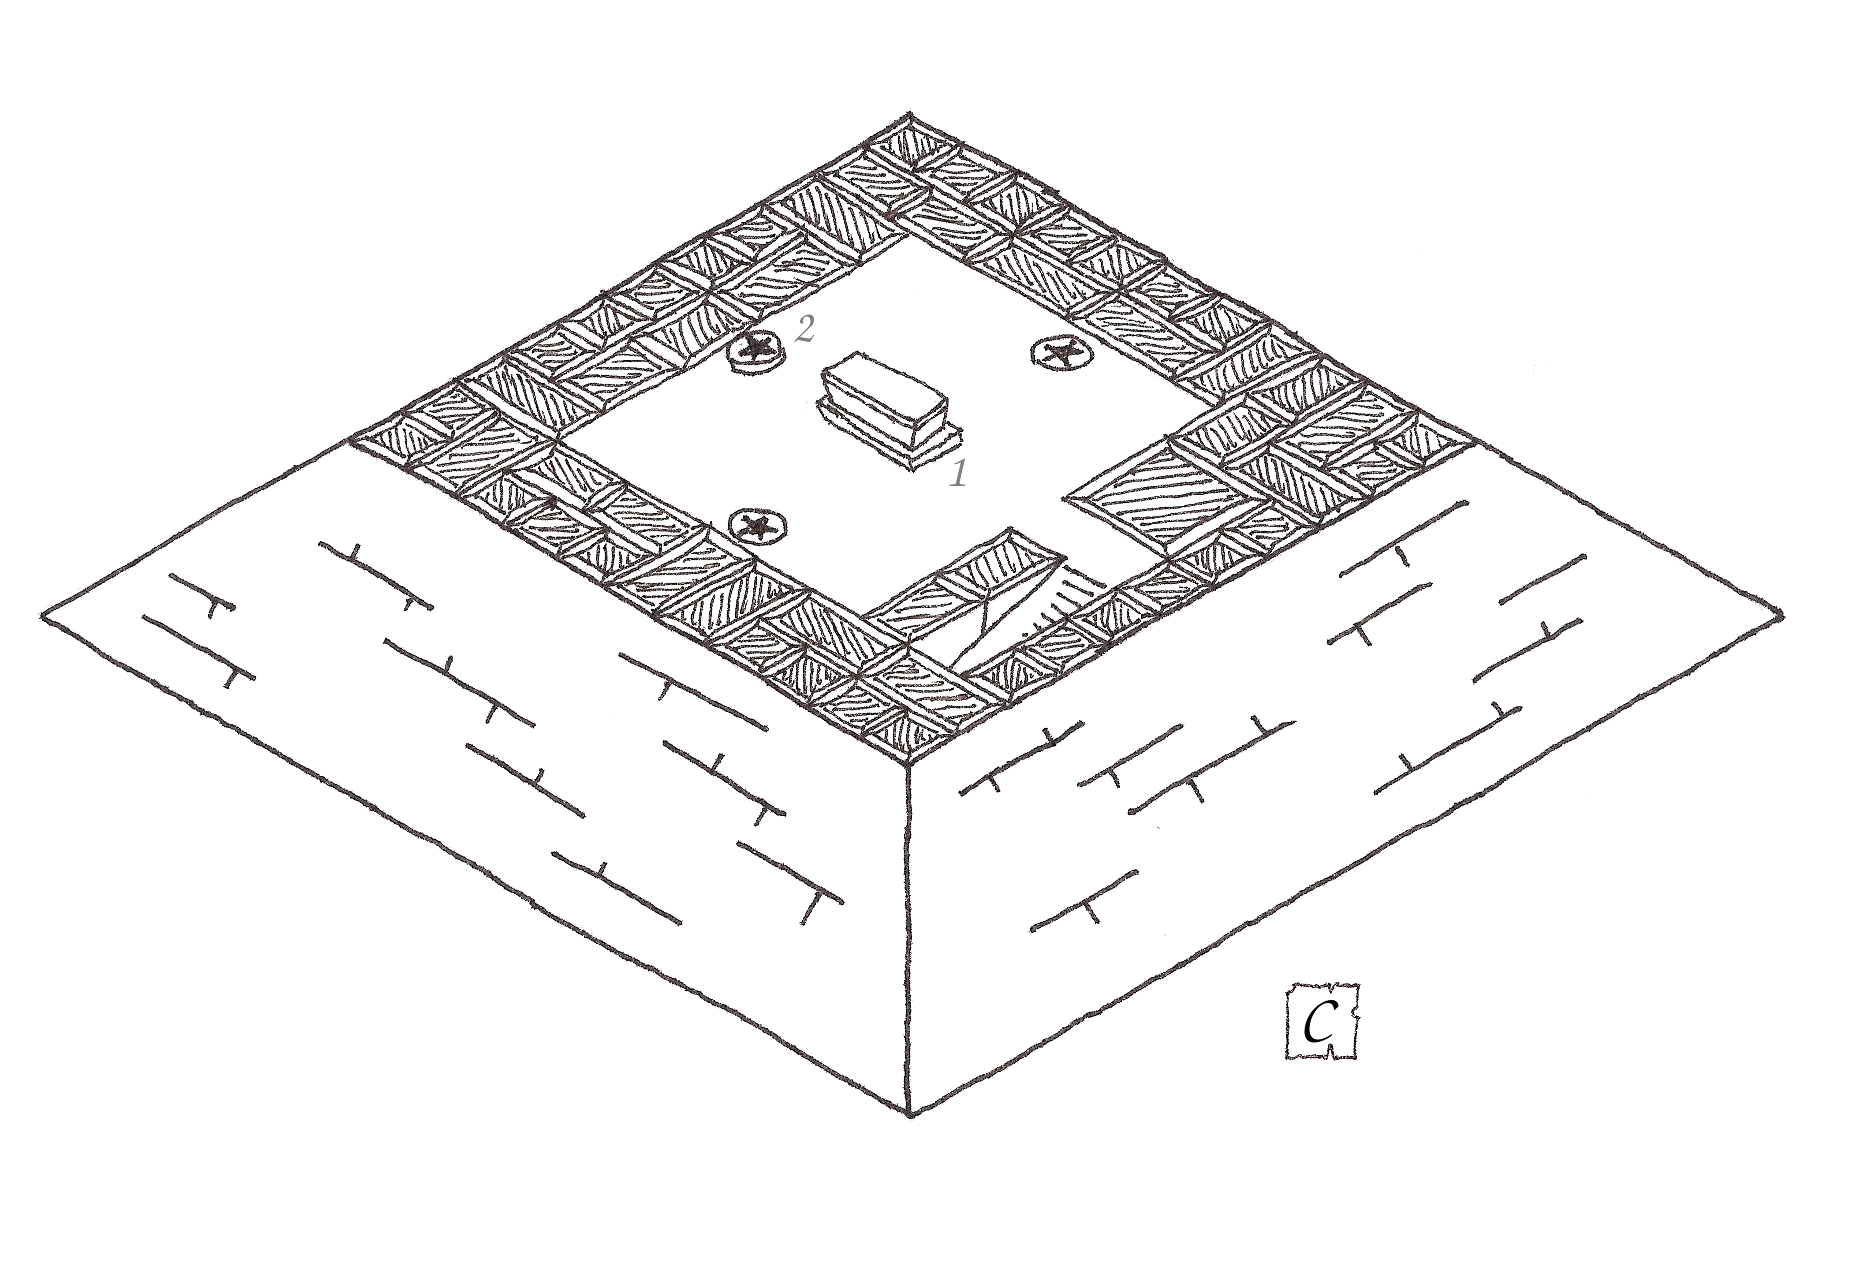
C: Inner Tomb
An opulent burial chamber is painted with images of weeping citizens. In the centre of the room is a dais supporting a huge sarcophagus (C1) plated with gold and precious gems. At the rear wall, the large brick pillar continues upwards to terminate on this floor, forming a brick-patterned dais at the rear. On top of it is a large silver statue of the king (C2), holding aloft a book. Two large muscular statues armed with greatswords stand on either side of the chamber; these are of marble, but details are picked out in silver plate and semi-precious stones.
The undead king spends his time here, a red-and-gold light burning in his eyes. He can communicate with and direct his subjects by mental command thanks to the strange power that animates him. Large supplies of fresh food seem to have been delivered here, and there are even some half-eaten leftovers (apple cores, bread crusts, etc).
Hiding behind the sarcophagus (or possibly inside) is the red-clad adventurer William. At some point in his travels he has lost his left arm, although he fights well enough with the remaining one. William wishes to control the king into driving away or killing the characters, but the king will take any opportunity to subvert those orders and “accidentally” reveal William’s prescence to the party. If the tiara is knocked off, stolen, damaged, etc. then the king will be able to act freely: not being stupid, his top priority if this occurs will be to secure the tiara for himself or else destroy it outright. The other undead in the city remain his loyal subjects, and he will almost certainly mentally call for a contingent of the royal guard immediately.
Cut out all the pyramid map pieces and stack them on top of each other for fun times! This piece serves as the final cap.
William Defeated
William possesses a scroll case containing the final page of the text regarding the Gadolim, having lost the other pages to banditry, ransom, or using them as bribes. He desires to find the king’s mystic jewel and harness its energy to summon and bind the Angel of Destruction described within. He was under the impression that the sacred pendant and book were here in the burial chamber, but daren’t leave to find the pendant’s true location for fear of the sobbing spirits of floor B, after almost succumbing to suicide during a confrontation with them earlier. He deliberately arranged for the royal guard to reset the traps and keys of the pyramid, to keep out intruders while he figured out his next step.
If the threat from William and the tiara have been neutralised, the king will probably resignedly admit that he and his subjects belong in the grave. Finding a way to undo the tiara’s magic is up to the players. Although the tiara normally only animates a single body, its magic was accidentally enhanced by the sacred geometry and sigils of the pyramid and brought the king’s subjects back also. They are not directly controlled by the tiara’s compulsion effect, and their fate is tied to the king: if the magic’s effect on the king can be broken (destroying him will qualify), all the other undead will collapse immediately.
Epilogue, and Unfinished Business
Placing the sacred pendant atop the statue’s book will open the way to the secret resting-place of the mystic jewel; the king won’t volunteer this information, but won’t prevent the characters from retrieving it either. The statue and the large central column atop which it rests will descend down through each floor of the pyramid, then continue down to a deep cavern under the earth. The column has no means of ascending again, so finding a way out of the caverns is up to the characters and their ingenuity. In ancient days, there was once a man who got lost in the deep caverns for weeks before he reappeared, tattered and babbling about strange wooden creatures: but that’s a story for another time.
While the characters have been out adventuring, there’s still the matter of the sage Ladan and his plans to harness the powers of the Angels. If the characters have made no attempt to dissuade him, perhaps they will return to the Silver Tower to find only a glassy crater. And let us not forget that he sent copies of his notes to other sages in the capital city itself. How far have their researches gone, and how many copies of the document have been scribed?
As to the mystic jewel which the characters can now obtain, who knows what strange powers it holds? Perhaps it is a link to their next adventure….